Scrivener metadata is one of my favorite not-so-secret tricks when it comes to drafting and revising.
I’ve seen some posts about the metadata options Scrivener offers, but none of them use it the way I do, so I thought I’d add to the noise.
For a person who likes to be crazy-levels of organized, this is a lifesaver on both ends of the writing process. But even if you don’t consider yourself borderline fiendishly obsessed with lists and colors, there are ways to adapt my insanity to the flexibility your methods (or lack thereof) require.
(This post contains affiliate links, which means that if you click on one of the product links and end up buying something, I’ll receive 20% of sales. Why? Because Scrivener is amazing. I’ve used it for five years and love it. And I thought, you know, since I talk about it literally all the time, maybe I should have it help pay for this blog.)
Metadata and Drafting: All About The Outline
First, let’s talk about drafting.
Context: My most recent WIP is on a quick turnaround, so I’ve had to do a lot of front work to make the writing faster. The basic gist is that my MC has to trade his way to $700. With so much to keep track of (characters, locations, dates, traded goods), I had to sit down and map the story or else risk getting hopelessly mixed up.
Here’s what my outline looks like under the Outliner view option:
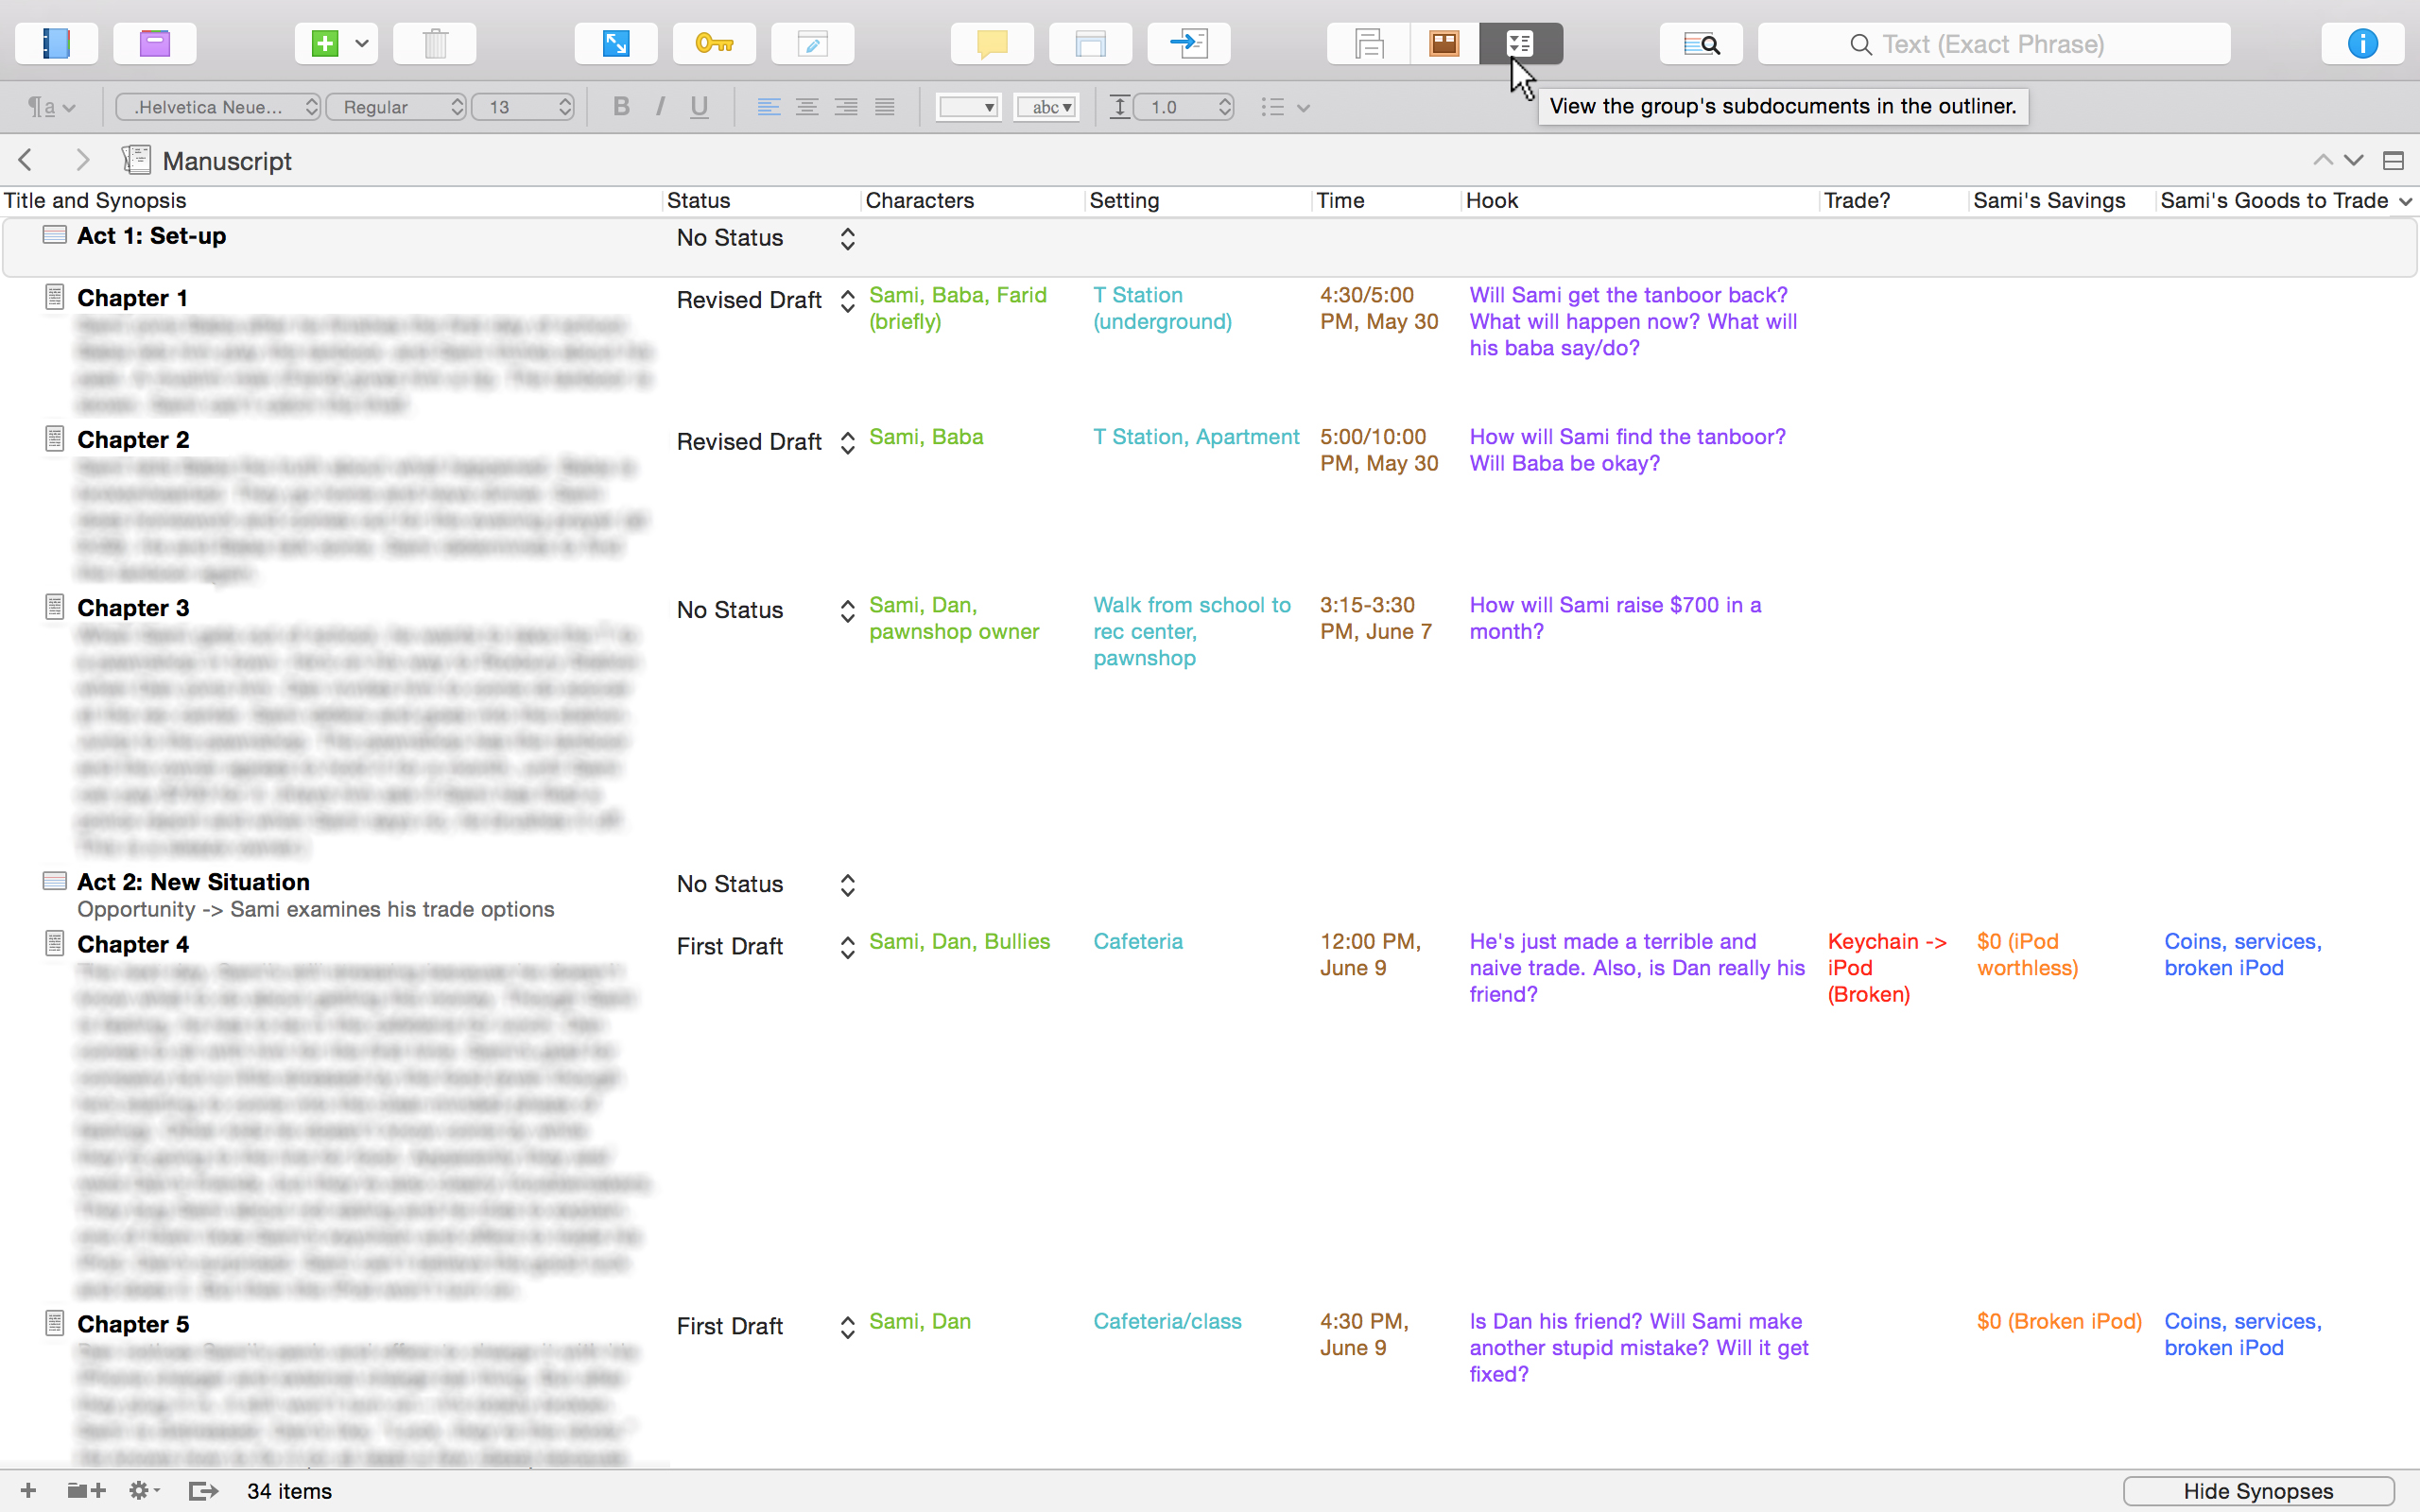
(Click to see the image bigger)
I’ll explain how I made this, but first let’s look at what’s here.
On the far left, the blurred out bits of text are my detailed chapter outlines. Each is about 200 words long (my entire outline clocks in at 5k). Beside that we have the status of each chapter marked (except where I’ve forgotten to update it, whoops). The colored bits of text are my metadata notes.
You can change what you want to display by clicking the little down arrow in the top-right corner. This allows you to look at whatever elements you want side-by-side. Here’s a picture of that:

(Click to see the image bigger)
(Note: You can rearrange the different categories by dragging them across the screen.)
Obviously, there are plenty of options. I’m not even sure what half of them mean, so let’s just stick with the metadata for now.
To make your own metadata, go into one of the chapters. Your screen should look something like this:
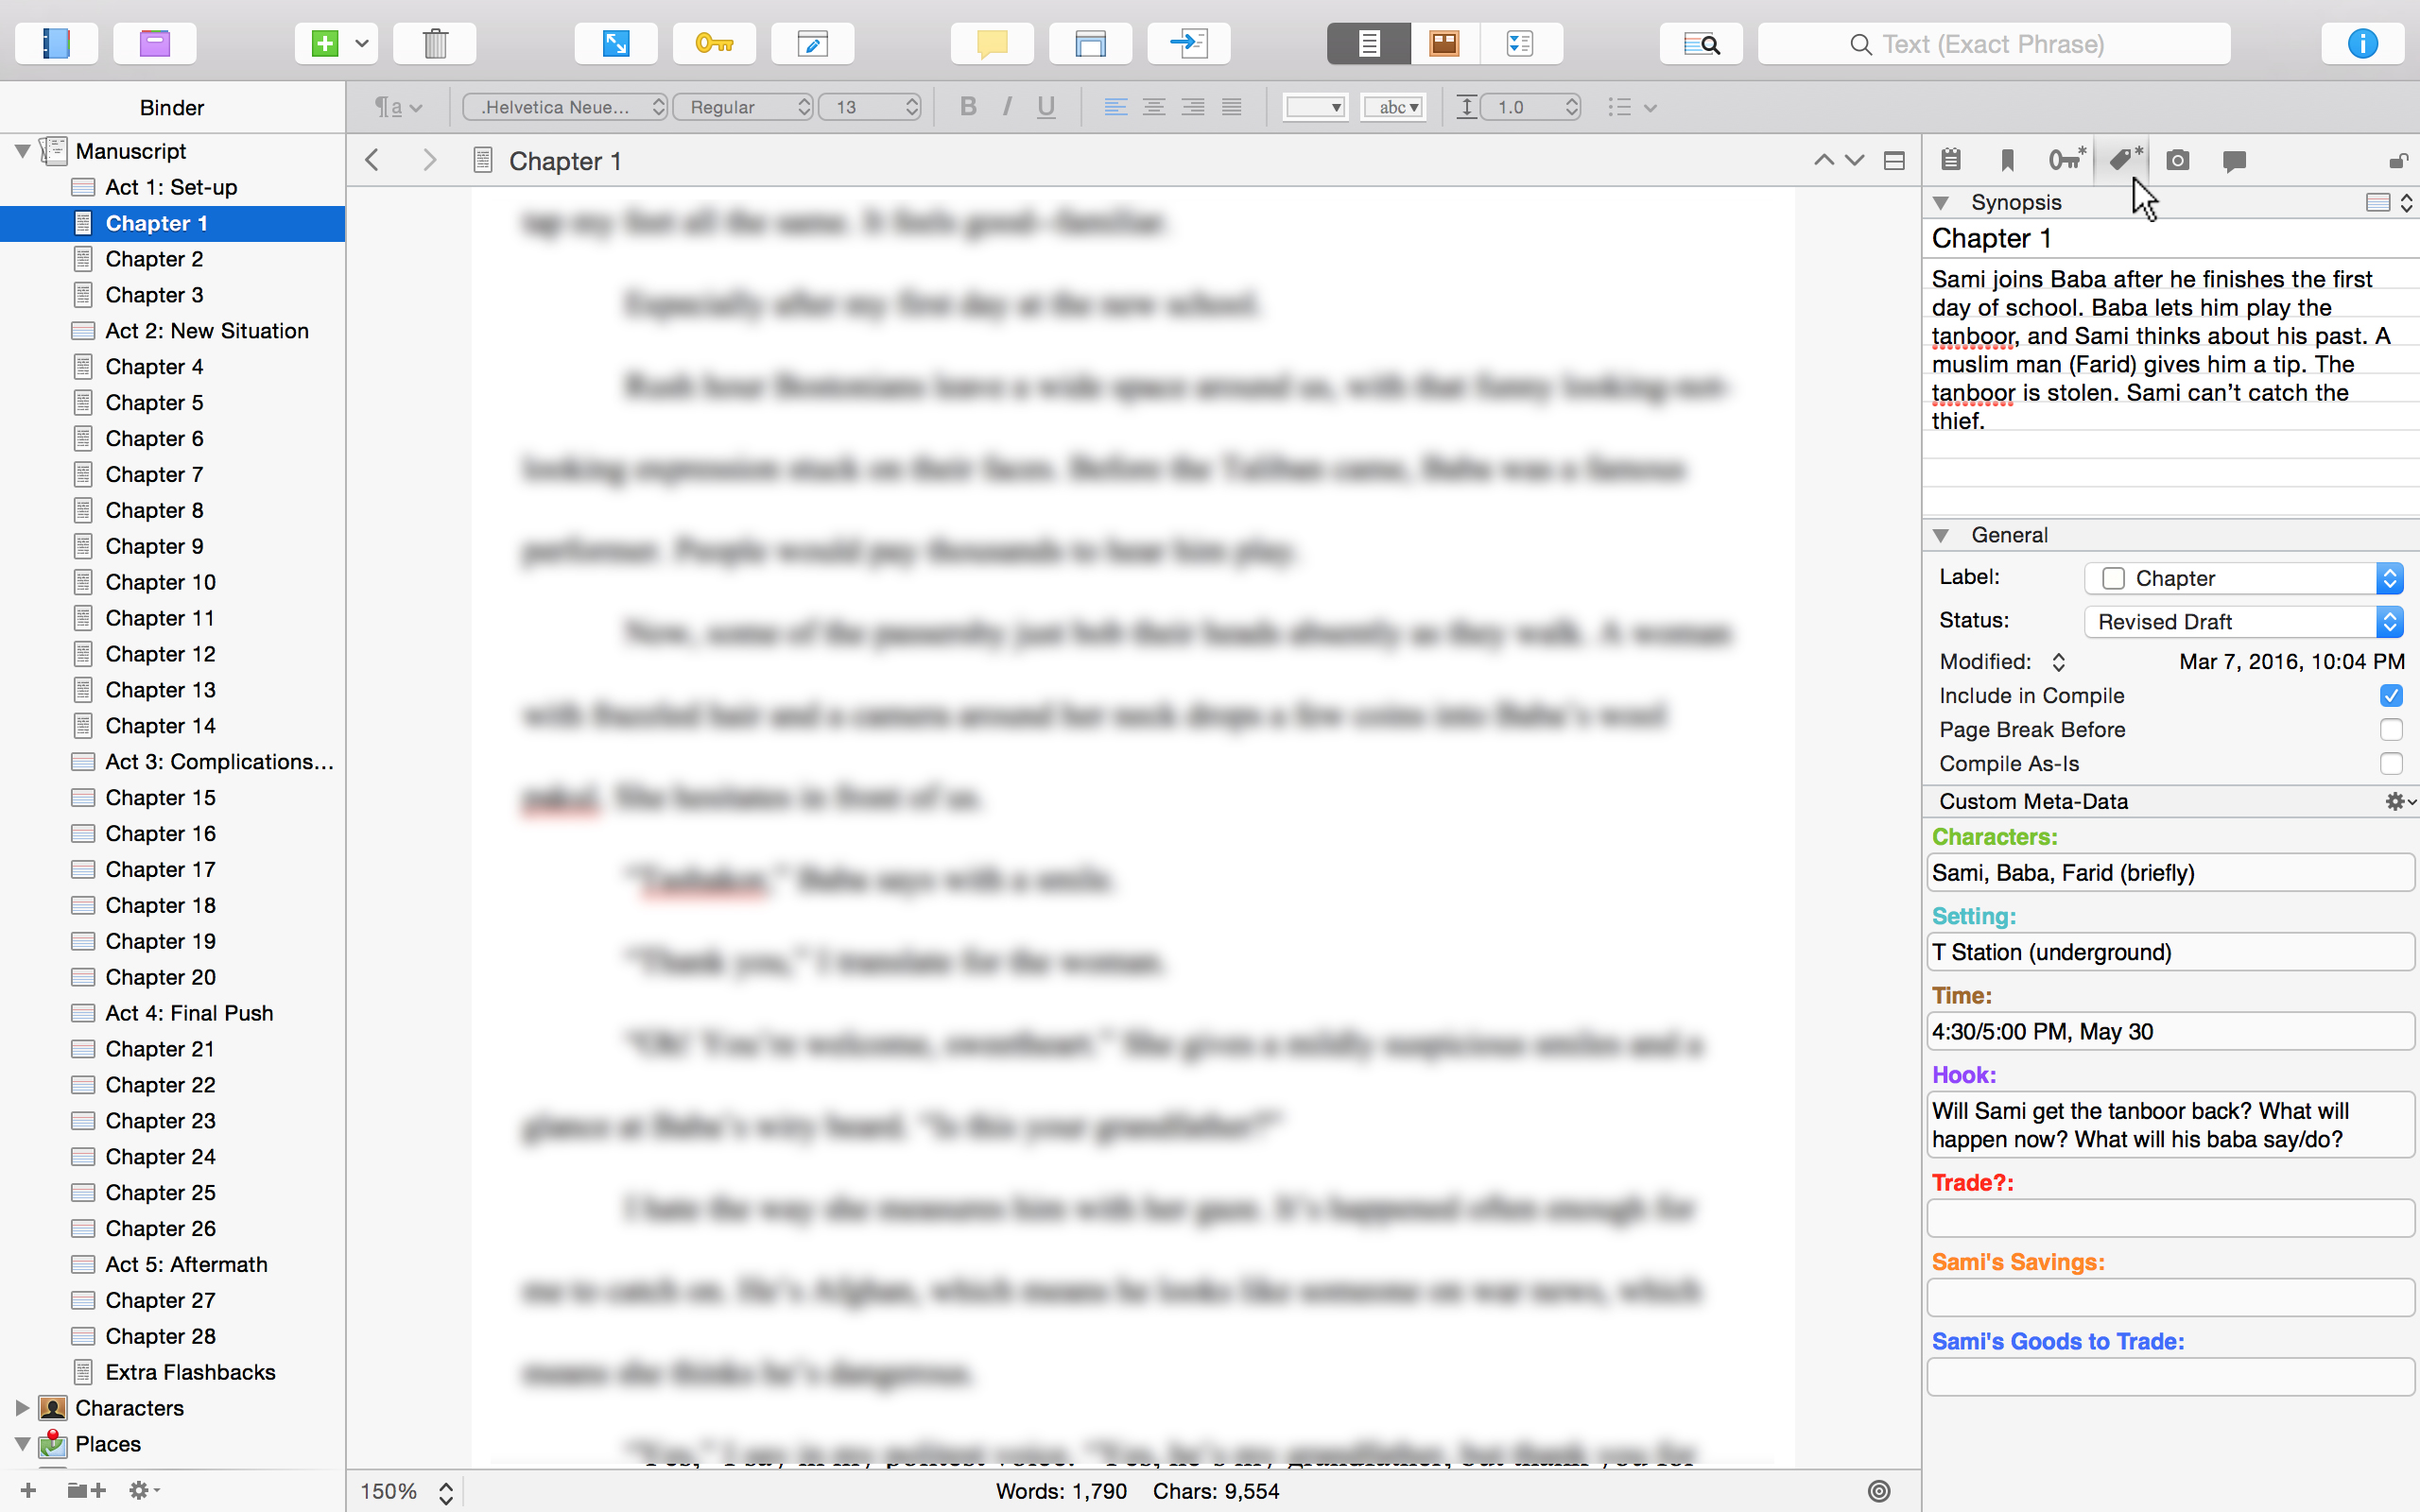
(Click to see the image bigger)
To see the metadata on that right sidebar (the inspector), click over to the tag icon (four from the left). If you haven’t added any metadata yet, it will look blank.
For outlining, first add your chapter synopsis in the designated spot. You might want to play with the label or the status in those drop-down menus.
Open the metadata settings by clicking on that little gear next to “Custom Meta-Data” and selecting the edit option. This window will pop up:
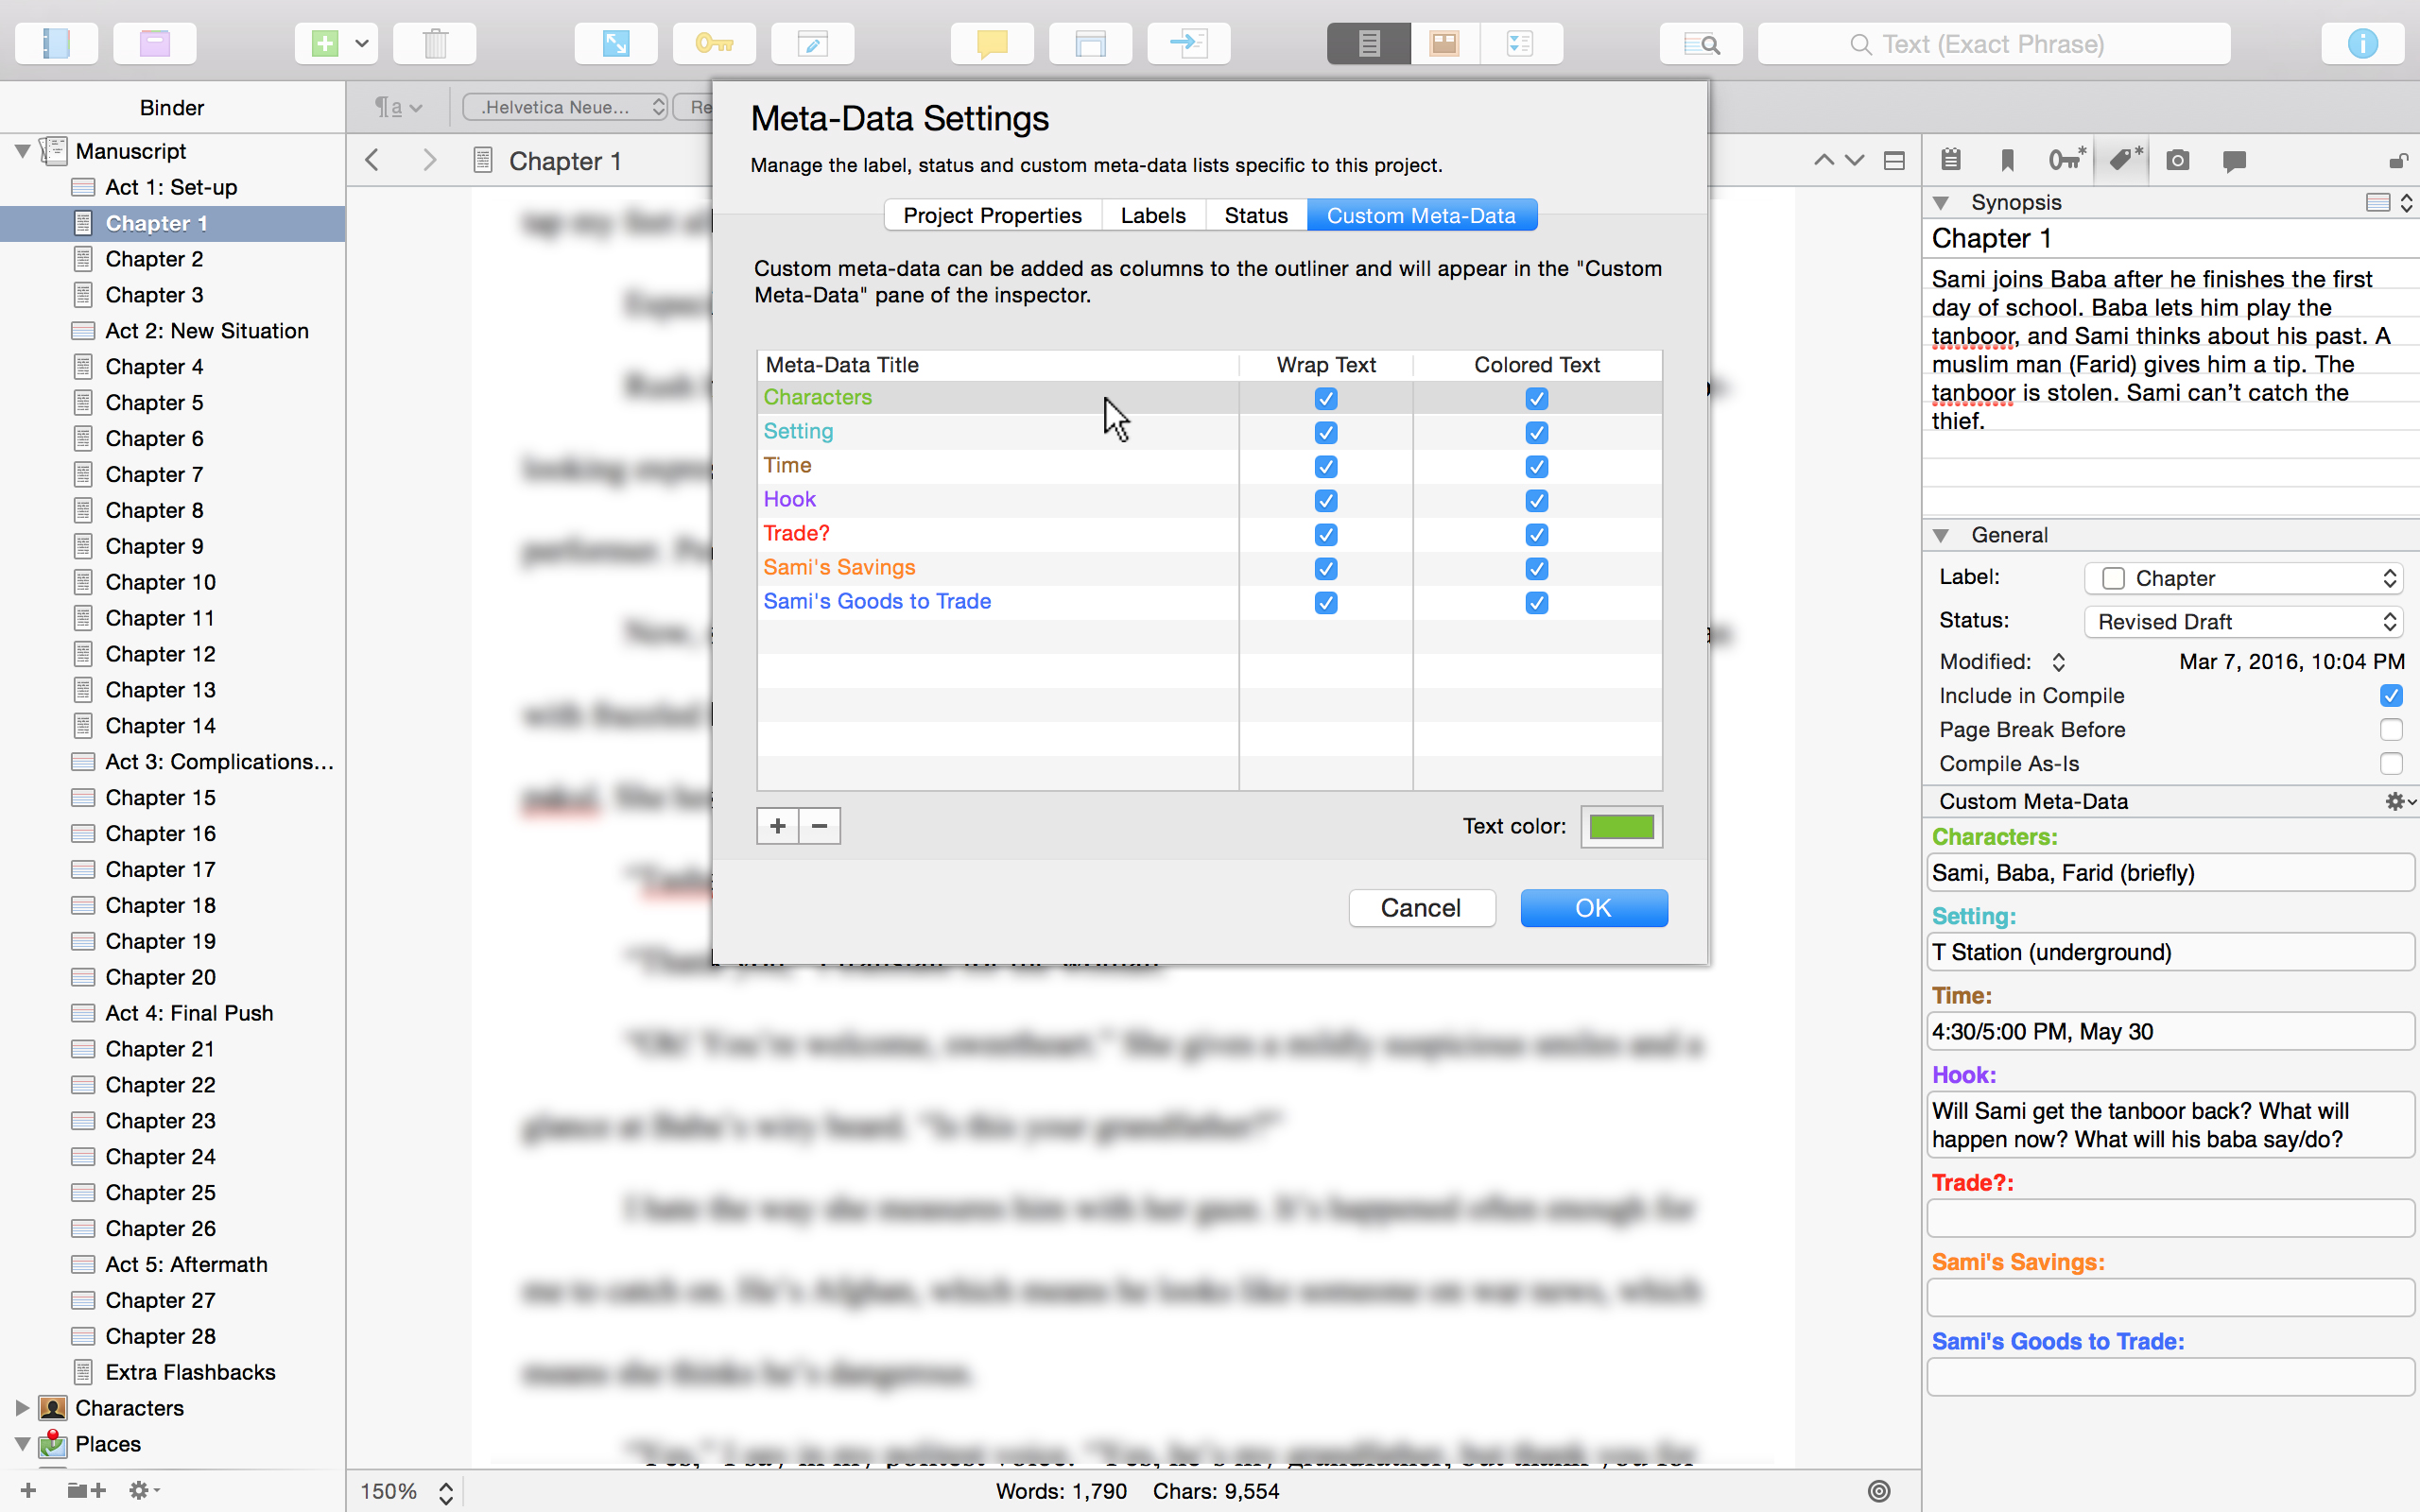
(Click to see the image bigger)
Click on the plus sign (+) there on the bottom. A new slot will open, and you can type in a metadata category. As you can see, my categories are: Characters, setting, time, hook, trade, Sami’s savings, Sami’s goods to trade.
Those first three (characters, setting, time, and hook) are great to have regardless of your project. This saves you from having to wonder about who’s in the scene, the place it’s happening, the time of day, and the hook you want to end with (what will keep the readers reading?).
I love having this information down ahead of time so I can free up brain space to actually write.
My last three (trade, Sami’s Savings, Sami’s goods to trade) are specific to my project, but necessarily things I have to know in every scene. Think about what to track from the get-go that might save you some heartache later, and add it in.
Next to your new metadata title are two check boxes (automatically unchecked when they’re new). Check them both. I like to use wrap text so that my lines don’t go on and on off the screen, and I like to use colored text because I love colors they are so pretty.
To change a color, click on the category you want (see picture above). The category’s color will show up on the bottom-right, just over “OK.” Click that square, and this pops up:

(Click to see the image bigger)
Pick whatever color your heart desires, and there you go.
Fill in the metadata blanks with the notes you need. Once you have put them in, you can click on your manuscript folder and do Outliner view. Your chapter should now look like mine in the first picture, with lovely colors and ready information.
Now that we know how to make metadata and use it for drafting, let’s look at using it during revision!
Metadata and Revising: The All-Important Checklist
In drafting, metadata is great for telling you where you’re going and helping you track certain elements of your story. In revision, it’s about catching mistakes, strengthening weak points, and fixing errors.
For my full revising plan, check out my Madwoman’s Revision Technique.
But in brief: Before I begin “real” revision, I sit down and look at big overarching categories that need work. For Illuminate (the WIP I’ll be using below), my categories were: Worldbuilding, the antagonists, MC being pro-active, writing quality.
Though I’m not displaying it on my overall look, I also had categories for magical elements, stakes, consistency, backstory, critique history… etc. etc. Clearly there was a lot of form for revision.
Here’s what that looks like on the Outliner View:

(Click to see the image bigger)
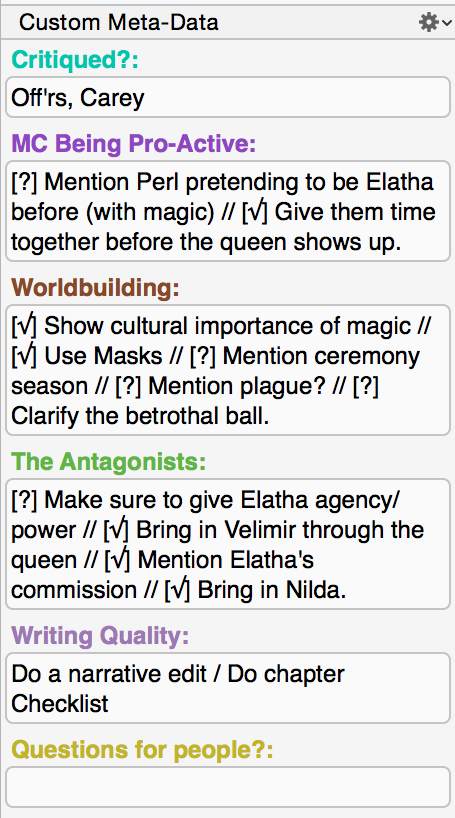
As you can see, my metadata notes aren’t so much notes as they are a checklist. Once I had my list of necessary, big-picture problems, I wrote out a series of smaller fixes.
For instance, in “worldbuilding” I knew I needed include more about the masks my characters wear and the plague that’s currently ravaging their school. You’ll see notes on those included in almost every chapter.
But I also individualized the checklist for chapters I knew had special problems. And when I couldn’t fit an element into a chapter neatly, I didn’t check it off – I just put a question mark instead.
So let’s look at the actual metadata:
I found having this information right next to the document as I edited extremely helpful. It challenged me to keep these issues in mind, always, but it also allowed me the freedom to focus on one issue at a time. One of my biggest struggles in revision is that I get distracted and forget what I was meant to change. With this, I’ve got my bases covered.
If you don’t want to go full-speed checklist, you can also make it easier by just leaving yourself little notes.
Like I said at the beginning, modify it to your needs. But at least now you can see what’s there, what needs doing, and how the process is going.
And that, friends, is how I use metadata and Scrivener to make my drafting and revising life easier!
Questions? Additions? Leave a comment below!