 I’m very visually oriented, if you haven’t guessed from the graphics series that appears periodically on this blog. I brainstorm and process stories best through tactile exercises. This is one reason my character sheets are a little bit ridiculous, but also very thorough. My friend and partner in crime, Annie, is much the same way — and at any given time you should assume that these blog entries were created by our hive mind because we steal each others’ stuff constantly.
Anyway. Today I’m going to walk you through making your own character sheet!
What’s a character sheet? It’s all the information vital to a character put in one place. I recommend keeping that page around/less than a page long, so it’s all nice, organized, and quick.
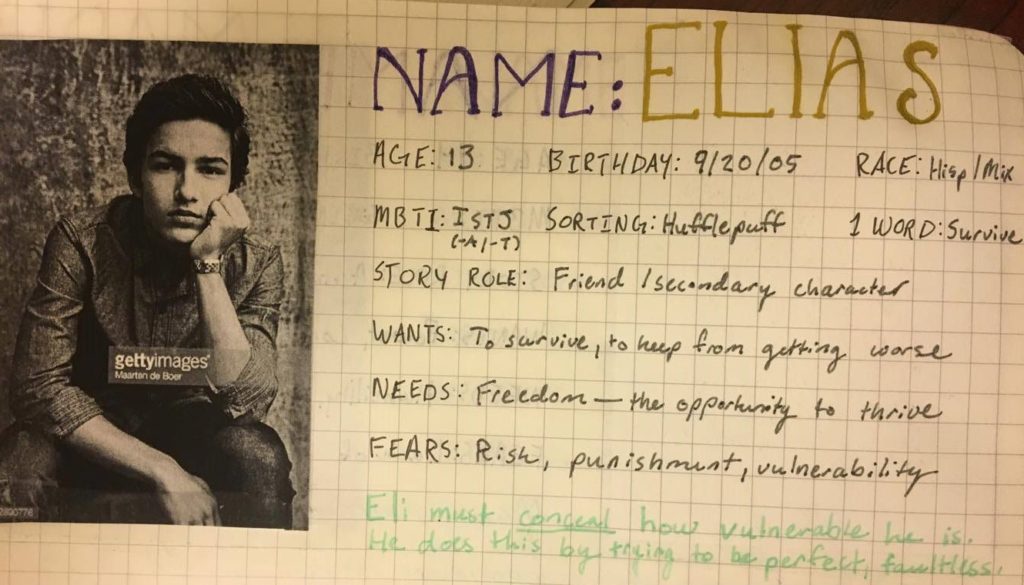
Here’s what my finished character sheet looks like for Eli (from The Invisible Boy):


(No spoilers for you guys!)
Look fun? That’s what I thought. Let’s assemble this piece by piece!
The Top Half
1. Name Thine Character
Names are at the start of everything for me. If a character doesn’t have a name, I can’t develop them — end of story. So get thee to Behind the Name, gather some friends around to give you name votes, and start brainstorming.
Level up your sheet: Go to dafont and find a typeface you like for the story (I’m using New Year 2017 for Invisible Boy). Write this typeface out nice and big across the top of your character sheet.
2. Cast Thine Character
Use Pinterest, IMDB, whatever you need to find a picture that looks like your character. Over time, I’ve personally started sliding more and more toward preferring pros (like actors, internet personalities, the occasional model) because it’s easier to find pictures of them in different poses and expressions.
Level up your sheet: Print this out at the wallet-size setting and tape it into your notebook. If you’re really particular, you can print them all in black and white to create a coloring consistency. (I warned you I was crazy.) You can also get fancy with double-sided or masking tape. I’ve just used good ole Scotch.
3. The Basics
The basics are the cluster of short-answer type character aspects, which you’ll place just below the name and to the right of the picture (if it’s laid out like this). Of course, you can add or subtract whatever other short categorizations you find helpful.
Here are the ones I use:
- Age
- Birthday
- Race
- Myer’s Briggs Personality Type (you can do the quiz for free here)
- Sorting (in Harry Potter houses, of course)
- 1 Word (the core of everything about this character)
- Story role (protagonist? supporting character? romantic interest? antagonist?)
- Wants
- Needs
- Fears
Level up your character sheet: Use one pen for the categorization and another for the answer. In my example, I’ve used a black pen and all-caps letters for the categorization and a gray pen for the answers.
4. The Concealment
There’s just one more bit left on the top half of the sheet. I took this idea from K.M. Weiland, one of my favorite bloggers about writing of all time. This line is about pinning down what it is the character tries to hide (which will, of course, be exposed and challenged in the course of the story).
The basic formula goes: [Character] must conceal [weakness]. He does this by [doing something wrong that will cause him trouble in the story].
Level up your character sheet: Write this in a different color from the rest of the top half.
The Bottom Half
1. Create Thine Tabs
This idea goes 100% out to Annie because she invited it and it is genius.
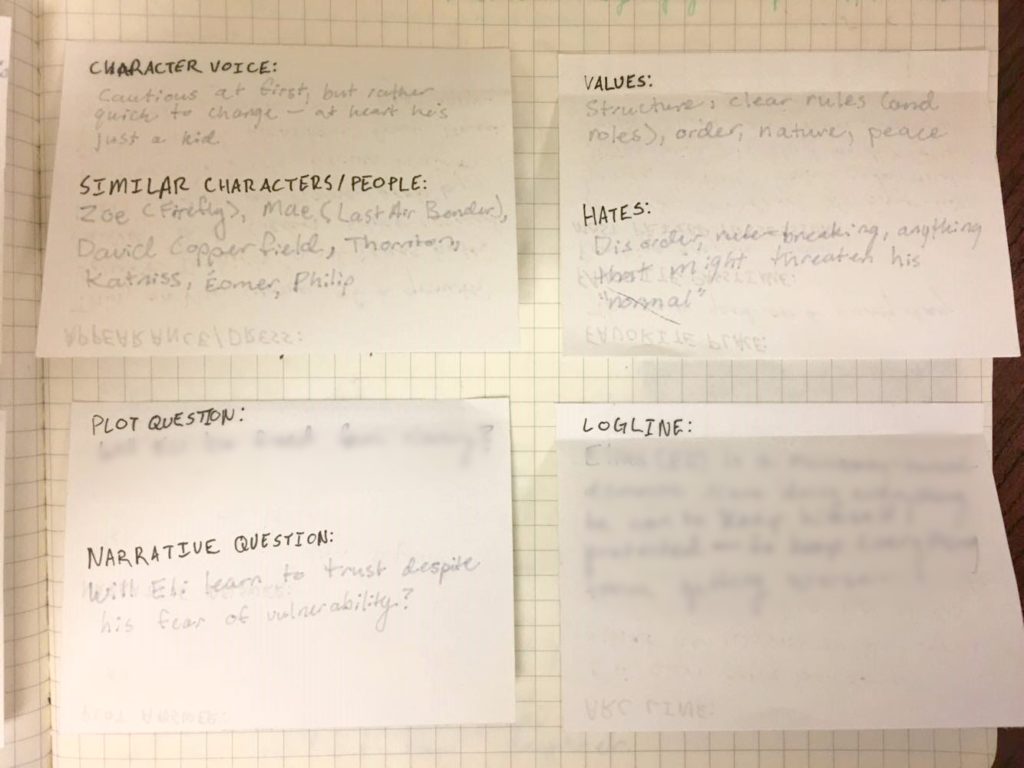
Take a look at your notebook/whatever you’re doing this on and figure out how to divide the remaining space into fourths. You can measure it out, use a sticky note for guidance, whatever works.
Once you know how big to make each of the four tabs, grab a regular piece of paper and cut them out. Then return to your piece of paper and tape the top end of the tabs down.
Level up your character sheet: Put a second line of tape on the underside of that top end. This way you can flip it up and down without folding the paper.
Note: You can also write out all the tab prompts below and tape the tabs on the page afterward. Up to you!
2. Fill Out Top Tabs
You still following? Good. Now it’s time to fill out the top of your tabs.
Tab 1
Character voice. Jot down some general observations about what the character sounds like, how they talk, and how that might change as they get to know someone.
Similar Characters/People. I personally find it really helpful to think of similar people I can use as inspiration for this character. Sometimes they’re people I actually know, but often they’re characters from books, movies, and shows.
Tab 2
Values. List the things that are most important to the character. Normally I end up listing concepts (like “safety”) more than things.
Hates. Again, I normally stick to concepts for this. What circumstances make the character most uncomfortable? (Vulnerability, danger, loneliness…)
Side note: I normally write out what I know are the character’s values and hates. But that doesn’t necessarily mean the character knows them. I know, I know, writing is very strange and meta.
Tab 3
Plot Question. See my blog entry on plot and narrative. This is where the plot (AKA external circumstance) question goes.
Narrative Question. See said entry. This is where the narrative (AKA internal/emotional) question goes.
Tab 4
Logline. This is your character in a sentence or two, about 25 words or less. It should include the character’s goal, stakes, and anything else vital to know about this character’s story.
3. Fill Out Bottom Tabs
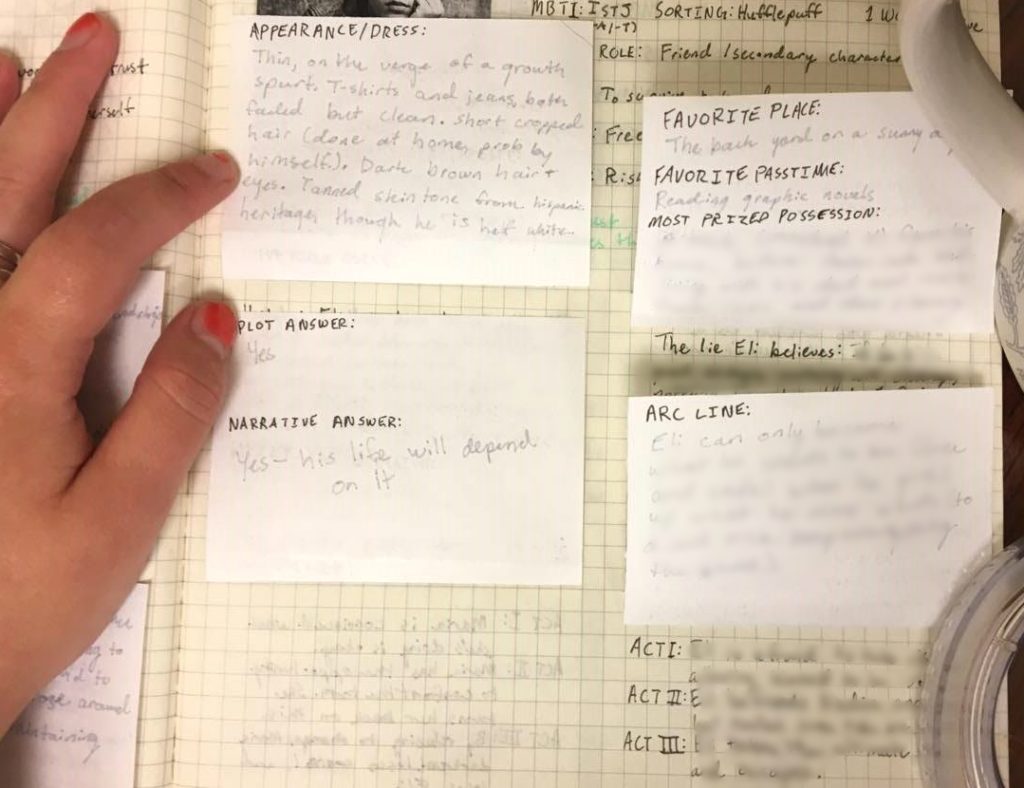
Flip your tabs open, and let’s tackle the bottom side!
Tab 1
Appearance/dress. Physical descriptions go here. If your character has any favorite types of clothes (or colors), include that in your description.
Tab 2
Favorite Place. Where in the world is your character most comfortable/safest/happiest?
Favorite Passtime.What does your character love to do in spare hours?
Most Prized Possession. You can cheat and pick more than one if you have to. I give you permission.
Tab 3
Plot Answer. See my blog entry on plot and narrative. This is where the plot (AKA external circumstance) answer goes.
Narrative Answer. See said entry. This is where the narrative (AKA internal/emotional) answer goes. Needless to say, both of these should correspond with the questions on the front side of this tab.
Tab 4
Arc line. An arc line is similar to the logline, but it captures more of the internal change your character has to go through.
My formula for this goes like:
[Character] can only become what they need to be ( [whatever that is — courageous, free, an adventurer — the answer to this can be found under your “need” line in the top half of the page] ) when they give up what they most want ( ).For example:
Emma Woodhouse can only become what she needs to be (a humble, kind person) when she gives up what she most wants (control over everyone around her–most importantly, Mr. Knightley).
Moana can only become what she needs to be (comfortable in her contradicting identity as a leader and a voyager) when she gives up what she most wants (to believe these contradictions are external–things she can choose or ignore).
Cinderella can only become what she needs to be (free of her step-family) when she gives up what she most wants (to be accepted/loved by said family).
Bam! Character growth.
3. Fill Out the Space Beneath the Tabs
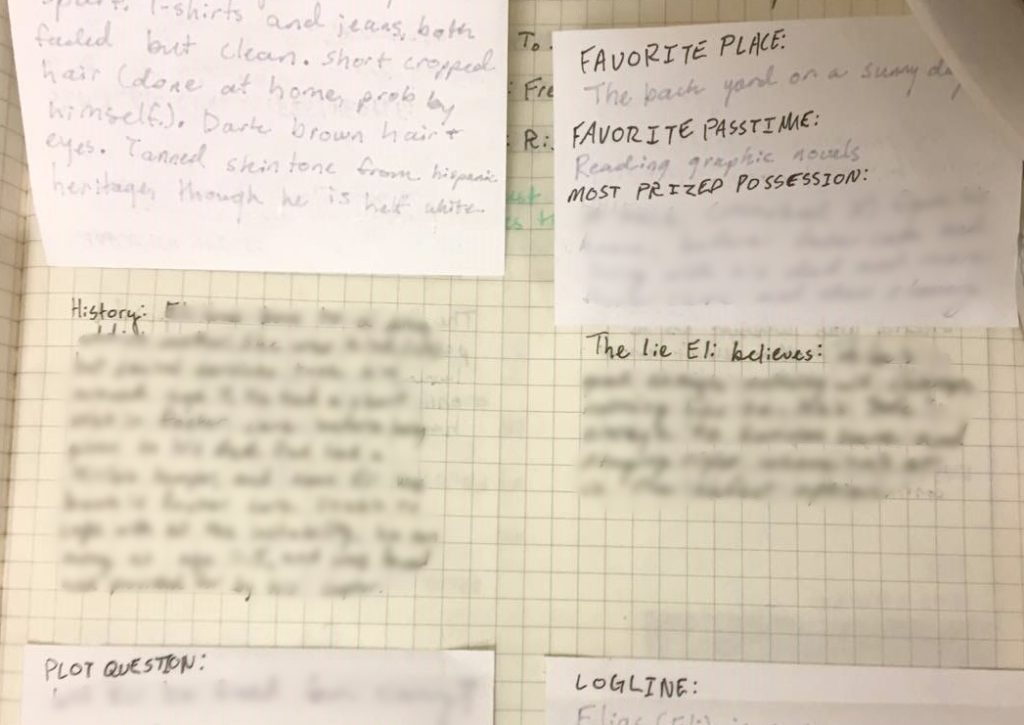
You may have noticed that there’s still a nice chunk of space free beneath the tabs. Lucky us, there’s some more room to squeeze in a couple more notes!
Tab 1
History. All the backstory that’s super important, anything that you need to know about how the character arrived on Page 1: It goes here.
“But wait!” you cry, fainting upon the couch. “I could write whole novels of backstory! How can I possibly ever fit it all in this tiny square?”
“Tough luck,” say I, dumping a barrel of live fish on your head. “Make it fit. Only keep the most important bits.”
You smell strongly of fish for weeks but you appreciate my tough guidance and give me a thousand dollars to show your gratitude.
(Hey, I can dream.)
(If you really do need more space for backstory, make it a separate entry and just include the SparkNotes version here.)
Tab 2
The Lie Your Character Believes. This is another idea from K.M. Weiland, and you can read about it at full-length here. Essentially, this is the lie standing between your character and the growth they need.
Tab 3
I actually didn’t put anything under this, so let’s just call it a freebie specially for you. Fill it or leave it, as you wish!
Tab 4
Act Lines. I know all this gets confusing–arc lines, act lines, loglines, so many lines. Bear with me, we’re so close!
Act lines outline what the character will be (or how they will change) in the course of the acts. So, say we’re going to split it into three acts, the way Doug TenNapel does in this video.
So it becomes:
ACT I: [How the character begins]
ACT II: [how the character changes]
ACT III: [Confirmation of the character’s change]
4. You’re Done!
Instagram that sucker. Make all your friends jealous of your beautiful character sheet.
Then take a nice long nap.
I’d love to see what you guys come up with! Feel free to post your character sheets in the comments. And if you have any questions about the process, ask below!

